Showing posts with label curved folding. Show all posts

Thursday, 23 January 2014

Fragile Beasts | Sculpting Paper


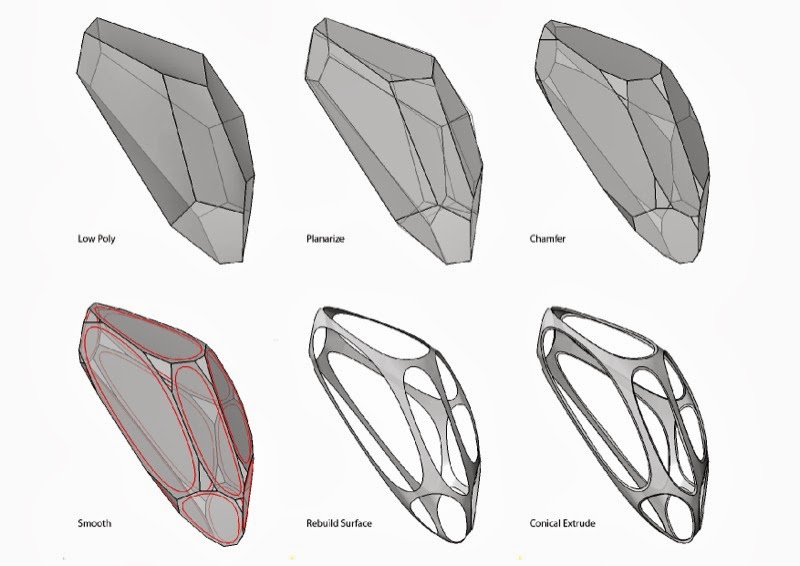
A short 3-day workshop at the Łódź University of Technology with a fantastic outcome. Together with 17 students, we managed to do some interesting exercises and build a 1.9m tall beast from half millimetre thick card paper. As evident in the diagrams, the beast was designed and modelled as a cluster of polyhedra, and then a series of scripts were applied to make it curved-foldable. 

Apart from how strong it was structurally (at least to support itself), there were two interesting outcomes of the workshop: In continuing the lineage of curved folding (previously here and here), this prototype proved that curved folded polyhedra can be aggregated to form more complex structures (albeit to a limited extent).

Secondly, it never fails to amaze me how nicely this shape lends itself to fabrication and quick assembly: this piece took about 5 hours of laser cutting time and a further 5 hours to fold, glue and assemble together; and all this by a group of 17 students who had never done any form of curved folding before.

Credits:
Anetta Kepczynska-Walczak | Assistant Professor, Łódź University of Technology, Poland
Sebastian Bialkowski | Doctoral Candidate, Łódź University of Technology, Poland
Suryansh Chandra | Senior Designer, ZHA | Code, London


The Design Intention

The Design Process
The LaserCut Pieces Arrive in the Studio

The Folding Assembly Line

Because Folding is so much Fun :)

Uhu it Up: Gluing the Pieces that form a single Polyhedron 

Parallel Processing: Each Polyhedron could be Assembled with a Small Team of Just 2 or 3

Completed First Polyhedron

Being a Sunday, we Hogged the Entire Corridor of our Floor to Setup our Assembly Line

Joining the first two Polyhedra

Edges Lineup Well

Some Narrow Edges Weren't Conducive to being Folded too Sharply

The Base Coming Together

The Lower Half Forming the Base and the Feet done

The Base and one of the Polyhedrons of the Crown. The Leftovers from the Laser Cutter made into Wall Art on the Left.

A Keystone Piece Locks Everything Together

Alignment Checks

SuperLight: One of the Advantages of Paper

Almost there: The Crown Being put into Place


All done: The Entire Team

Thanks to everyone involved for making this possible and finishing up with such an astonishing outcome in just 3 short days, and to the avid photographers for documenting the entire workshop and taking the pictures you see above. A special thanks to Anetta and Sebastian for all their hard work, time and working relentlessly to make sure everything went smoothly, and all the things we took for granted.

I am curious to see how long this piece stands against the brutality of moisture and curious human beings, which over time will soften and distort the paper eventually buckling and deforming.

Sunday, 11 August 2013

Curved Folding | Metal Twins

Continuing the lineage of research on Curved Folding, the AA Visiting School Bangalore series titled HyperThreads explored the subject over an intense 10-day workshop in 2012. Some very cool student projects, a lot of good energy, and finally two super-nice folded aluminium sculptures.

Credits:

ZHA: Shajay Bhooshan, Mustafa El Sayed, Suryansh Chandra, John Klein
Sasaki & Partners: Chikara Inamura
Populous: Alicia Nahmad
AA DRL: Shilpa Pattar

and the hosts InFORM Architects and InCITE gallery, Bangalore.


The finished sculptures.


Student work: corrupting known Origami tesselations.


Student work: curved folds as structural stiffeners.


Student work: curved folds as structural stiffeners.


Student work: the elegant simplicity of 3 curved folds on a sheet of paper.


Algorithmic method to setup a pipeline with which we could design.

Process video: Convex polygons to developable surfaces.


Design to Production: 15 sheets of aluminium, 3 hours of laser cutting.


Stability: Check.


1am in the studio, and we begin assembly.

Hand foldability: Check.


Hand-folded panels. Simple assembly tools: spanners and screw-drivers.


The first piece coming together.


The tricky last bits: fitting the last screws.


Finished pieces.


Paper models | Metal cousins.

Curvature continuity: Check.

 More eye-candy :)


The team, minus a few.


Wednesday, 28 November 2012

Curved Folding | Paper Giants

I was recently involved in a 2-day workshop with Ankon Mitra in New Delhi, India, exploring curved folding as a means of lending structural stiffness to paper. After having worked on the ZHA Venice Biennale installation with the rest of the ZHA Code Group, I was keen on taking the idea further and Ankon, having extensively worked with Origami tessellations and straight-line folding for several years, was an excellent person to have on board with all his experience and expertise. A really big thanks to him for organizing this and getting everything together on such short notice, the hosts, Amit and Monika Gulati, and all the participants for making this happen.

Being an intensive 2-day workshop, the first day involved developing an intuitive understanding of material behaviour and basic thumb-rule principles of curved folding. Participants started with folding some known tessellation patterns by Jeannine Mosely, Andrea Russo and Richard Sweeney, and then went on to draw up their own patterns, learning what could fold and what could not. The first half of day-2 involved folding hypars (hyperbolic paraboloids) and corrupting, distorting and modifying them to create derivatives and satiate curiosity of what will or will not fold. Below is a small selection of the work done by the participants.


The second half of day-2 involved collectively making a 5 feet tall installation out of 210gsm (ivory) card paper to test if curved folding was strong enough to make it stand with such thin paper. The design process (illustrated below) started with a dodecahedron whose faces were further subdivided into smaller pentagons and planarized. The entire process of evolution is best explained by the illustration below:


This process gave us developable surfaces that were flattened into 6 modules and mass produced by a combination of hand cutting and using a digital vinyl cutter. Each of these building blocks was hand folded and stuck together using thin strips of paper as backing-plates and ordinary glue. Below an image sequence and time-lapse video of the assembly process.


I have to admit that before we started assembly, I was quite nervous if it this would stand: I was expecting the cap to collapse towards the centre like a bean-bag. But much to our amusement, not only did it stand, it was decently resilient to bending and external forces.


Having completed this and being pleasantly surprised by how well paper behaved, now I almost wish we had made this out of ordinary copier paper. Perhaps in some ways, I secretly did want to find the point where it would fail :)